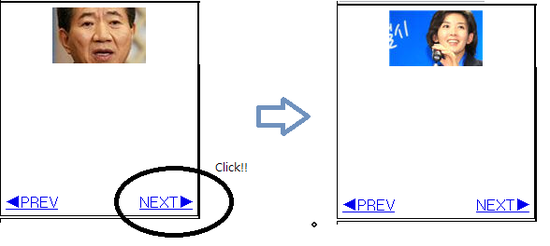
jQuery를 이용해 이미지 슬라이드 이벤트 처리 예제인데요,
대략적인 원리만 설명하도록 하겠습니다.
1. 샘플 스크린 샷
아래와 같은 화면을 생성하고 NEXT 버튼을 클릭하면 슬라이드 되면서 다른 이미지로 교체됩니다.

2. jQuery 라이브러리 등록
jQuery와 jQuery.ui 라이브러리를 등록해야 하는데 여기서는 설명하지 않겠습니다.
아래와 같이.. 라이브러리 추가~!.
<!DOCTYPE html>
<html>
<head>
<link rel="stylesheet" type="text/css" media="screen" href="/resources/css/jquery-ui-1.7.3.custom.css">
<script type="text/javascript" src="/resources/javascript/jquery/jquery-1.7.1.js" ></script>
<script type="text/javascript" src="/resources/javascript/jquery/jquery-ui-1.7.3.custom.min.js" ></script>
</head>
3. HTML Code
HTML 엘리먼트의 구조는 아래와 같이 구성을 합니다.
<div style="width: 200px; height: auto; border: 1px solid black; display: block;
overflow: hidden; float: left; text-align: center; padding: 5px;">
<ul id="ul_list" style="width: 2000px; height: 200px; display: block; overflow: hidden;">
<li style="float: left; width: 200px; height: 200px;">
<img alt="" src="http://static.naver.net/newscast/2012/0229/07063497507647.jpg">
</li>
<li style="float: left; width: 200px; height: 200px;">
<img alt="" src="http://static.naver.net/newscast/2012/0229/00264943252055.jpg">
</li>
<li style="float: left; width: 200px; height: 200px;">
<img alt="" src="http://static.naver.net/newscast/2012/0229/07063497507647.jpg">
</li>
<li style="float: left; width: 200px; height: 200px;">
<img alt="" src="http://static.naver.net/newscast/2012/0229/07063497507647.jpg">
</li>
<li style="float: left; width: 200px; height: 200px;">
<img alt="" src="http://static.naver.net/newscast/2012/0229/07063497507647.jpg">
</li>
<li style="float: left; width: 200px; height: 200px;">
<img alt="" src="http://static.naver.net/newscast/2012/0229/00264943252055.jpg">
</li>
<li style="float: left; width: 200px; height: 200px;">
<img alt="" src="http://static.naver.net/newscast/2012/0229/00264943252055.jpg">
</li>
<li style="float: left; width: 200px; height: 200px;">
<img alt="" src="http://static.naver.net/newscast/2012/0229/00264943252055.jpg">
</li>
</ul>
<ul>
<li style="float: left;">
<a href="javascript:;" id="prev_btn">◀PREV</a>
</li>
<li style="float: right;">
<a href="javascript:;" id="next_btn">NEXT▶</a>
</li>
</ul>
</div>
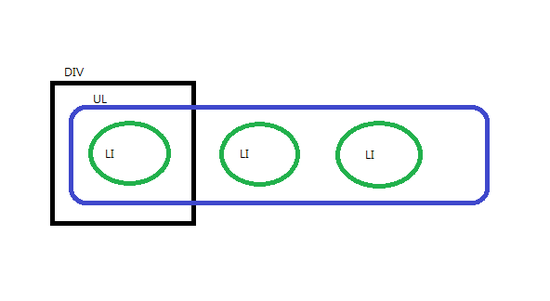
이것을 그림으로 표현하면 아래와 같은 모양입니다.
DIV안의 모습이 화면에 나타나고.. DIV 바깥쪽으로 튀어나와 있는 UL 엘리먼틔 안의 내용물은
다른 요소들에 가려져 화면에 나타나지 않습니다.
이런 원리를 이용해서 화면에 보여지는 UL 엘리먼트의 위치를 옮겨주는 것으로
슬라이드 이벤트를 구현할 수 있습니다.


4. JavaScript
<script type="text/javascript">
$( document ).ready( function() {
$( "#next_btn" ).click( function() {
var offset = $( "#ul_list" ).offset();
offset.left -= 200;
$( "#ul_list" ).animate( {
left : '-=200'
}, 300 );
$( "#ul_list" ).offset( offset );
});
$( "#prev_btn" ).click( function() {
var offset = $( "#ul_list" ).offset();
offset.left += 200;
$( "#ul_list" ).animate( {
left : '+=200'
}, 300 );
$( "#ul_list" ).offset( offset );
});
});
</script>
offset() 메서드는 해당 엘리먼트의 시작위치 정보를 갖고 있는 객체를 반환합니다.
이 객체의 .left 속성에 left 위치 값에 -를 하게 되면 화면이 좌측으로 이동하고 +를 하게 되면
우측으로 이동하게 되는 겁니다.
감기 기운에 귀찮아서.. 대충 포스팅 했네요. ㅠ
괜히 올려서.. 보는 사람 더 헷갈리게 하는 거 아닌가 몰겠네. ㅋㅋㅋ
[출처] http://blog.naver.com/jukrang?Redirect=Log&logNo=40153392046
'JavaScript > Jquery' 카테고리의 다른 글
| [jQuery] JQuery touchslider (0) | 2013.12.31 |
|---|---|
| [jQuery] Prototype.js는 무엇인가? (0) | 2013.11.10 |
| [Jquery] popup 참고 (0) | 2012.11.30 |
| [Jquery] 파람값 세팅 (0) | 2012.11.28 |
| [jQuery] jqGrid 조회 (0) | 2012.10.26 |